Baseboards probably suffer the most hits and bumps compared to the rest of the house, especially if you have pets or kids. Since they’re in high-traffic areas, it is not unusual for the paint to chip after getting knocked too many times while vacuuming. How you touch up baseboards will depend on the material, the damage, and the type of finish.
Here’s how to touch up baseboards (fix chips, stains, scuffs):
- Scrape and sand scratched or chipped wooden baseboards.
- Caulk baseboard gaps.
- Clean stains with warm water, vinegar, and liquid soap.
- Fill the gouges with wood filler.
- Fix the lower gap with shoe molding.
- Use a kneaded rubber eraser or alcohol on vacuum scuff.
- Sand chipped area before applying primer and paint.
- Sand and clean scratches on PVC baseboards.
- Lightly sand and clean water damaged MDF trims.
Baseboard damage is inevitable. So, this article will look at the types of baseboard damages and how you can touch up yours to make it look as good as new.

1. Scrape and Sand Scratched or Chipped Wooden Baseboards
Even if the rest of your house is pristine, scratched or chipped baseboards can make it look old and worn out.
Scratches and chips are very common and could be caused by anxious or excited pets, or kids kicking the ball around.
Fixing Chips in Baseboards
To fix chips, lightly scrape off the fragmented wood, so it doesn’t hurt you when sanding the area.
However, if a splinter is still attached after chipping, it’s best to leave it. Then, sand the section until all the pieces are smoothened out.
This video illustrates how you can fix chipped wooden baseboards:
Fixing Chips in Painted Baseboards
If the baseboard is painted, use a light coat of drywall joint compound. Avoid using too much because you’ll just spend more time sanding it until it evens out.
Instead, apply small amounts until you are satisfied. Leave it to dry and then sand until smooth.
Once you finish, apply wood primer before painting the area.
Fixing Chips in Unpainted or Stained Baseboards
When working with unpainted or stained wooden trims, use epoxy wood filler.
This PC Products Two-Part Epoxy Paste, (link to Amazon), is an indoor and outdoor application used to fix damaged, missing, or rotten wood. It has a high tack which prevents it from sagging or dripping as it hardens. This epoxy is suitable for trims made of wood or plastic.
Once it dries, you can stain or paint the baseboard.
If you don’t want to use epoxy, stain the wood and add a coat or two of polyurethane varnish.
This Varathane Water-Based Polyurethane Wood Finish (link to Amazon) is an excellent alternative for epoxy wood filler. It dries quickly and is easy to clean with soap and water. It’s perfect for fixing your damaged wood baseboard because it dries within 30 minutes and will be ready for a recoat within 2 hours. The gloss finish helps hide the repaired area and gives a clean finish.
2. Caulk Baseboard Gaps
Gaps at the top or bottom of baseboards are not uncommon, but they are unsightly.
The hole at the top usually results from fixing the baseboard on a wall that’s not perfectly flat, while one at the bottom is often due to sagging floor joists.
If the gap at the top is narrow, caulking it is good enough. Just ensure you get caulk that is the same color as the wall. If not, then get a paintable one.
Non-paintable caulks usually have an oil base that does not hold paint, so carefully read the labels before you make your purchase.
Paintable caulks are acrylic latex products. However, some have traces of silicone which makes them slightly more expensive – but durable.
This Red Devil Acrylic Latex Sealant (link to Amazon) has superior adhesion and flexibility that make it suitable for fixing your baseboard. It does not shrink or crack. In addition, this caulk is paintable and is easy to clean with soap and water.
When applying caulk to fill baseboard gaps:
- Scrape off the drywall compound or dried paint at the top or bottom of the baseboard. Use a vacuum or blower to remove any debris.
- Clean the joints with a cloth and warm soapy water. You can also use trisodium phosphate (TSP) cleaner.
- Run painter’s tape at the bottom of the baseboard if you’re fixing the gaps below. Mount the caulk in a caulk gun, then start running a bead of caulk along the cracks.
- Run a wet finger over the caulk to smooth it properly and to remove excess caulk. Wash your hands to remove the excess caulk. If you still notice gaps, apply a small amount of caulk in the area.
- Allow the caulk to dry, and if any gaps develop when it shrinks, fix them by following the same process. If you used a paintable caulk, you can now paint it to match the wall or baseboard.
Source: This Old House
3. Clean Stains With Warm Water, Vinegar, and Liquid Soap
Carrying out regular cleaning of baseboards will help remove stains and scuff.
Since baseboards are often neglected during regular cleaning, it is not surprising that they collect plenty of dirt. Therefore, before you attempt to remove stains using another complicated method, try cleaning them first.
You’ll need a soft, microfiber cloth and a container with the cleaning solution. The cleaning solution should consist of warm water with a dash of dish soap and half a cup of white vinegar.
When cleaning the baseboard, ensure you wring out as much water as possible from the cloth as water will cause the paint on the baseboard to chip over time.
Use a toothbrush to clean tight corners and crevices.
When you finish, use a dry cloth to remove all the moisture. If some stains and scuffs are still visible, you need to try other remedies.
Vinegar is one of my all-time favorite home cleaning products. See How To Clean And Sanitize Hardwood Floors With White Vinegar And Water
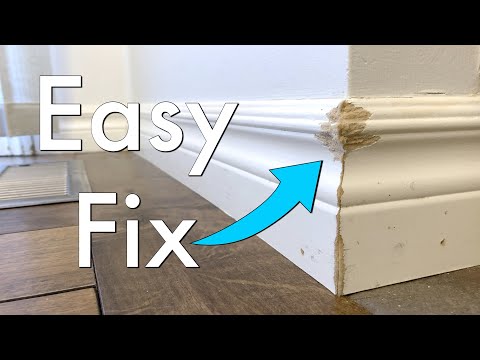
4. Fill the Gouges With Wood Filler
Wood filler is easy to use and can quickly improve the appearance of your baseboards. Choose the type of wood filler to use based on the type of finish on your baseboard:
- If it’s stained, use stainable wood fillers.
- Water-based wood fillers are great for both stained and painted wooden trims.
When using wood fillers, you need to;
- Sand and clean the damaged area. Remove loose splinters.
- Use a putty knife to apply the wood filler. Wood filler tends to shrink as it dries, so it is best to apply more filler.
- If the gouge is shallow, the wood filler should dry in a few minutes. The filler will take longer to dry if the gouge is deep.
- Sand the area until it is even with the rest of the baseboard. If some areas still need the wood filler, apply a little more, wait for it to dry before sanding it.
- Paint or stain the fixed area. The aim is to make the selected area appear the same as the rest of the trim, so you should use a stain or paint color that matches the original paint or stain.
I’ve used Minwax Stainable Wood Filler (link to Amazon) for years. It is ideal for fixing cracks, nail holes, and small gouges on wooden baseboards. It sands easily and works well with water-based and oil-based wood stains. In addition, this filler can be stained and painted.
5. Fix the Lower Gap With Shoe Molding
The gap between the baseboard and floor can be just as unsightly as the gap above. While you can caulk this area, it is not as easy as fixing the crack above.
Shoe molding – a thin strip of molding used to bridge the gap between the baseboard and the floor – will give it a neater and more presentable finish.
When buying shoe molding, make sure they are all the same size. Some manufacturers unintentionally pack different sizes together, so you need to ensure that you get the right size to fix the baseboards in your home.
You should also get the material that matches your baseboard. Shoe moldings are available in MDF, wood, and polystyrene.
6. Use a Kneaded Rubber Eraser or Alcohol on Vacuum Scuff
Do the bumpers on your vacuum cleaner often leave scuff on the baseboard or shoe molding?
If your trim is white and the vacuum bumpers are black, then scuffs will be visible, and they’ll ruin the aesthetic appeal of your home.
You need to be careful when cleaning scuffs on painted wooden baseboards as you can easily chip the paint. Here’s how:
- Use pressure when using a kneaded rubber eraser. Keep kneading the eraser to ensure you don’t rub the scuff marks back onto the baseboard.
- If the eraser does not work, use rubbing alcohol. Pour some rubbing alcohol on a piece of cloth. Make sure you can see dirt on the fabric, as this signifies the alcohol is working. If the marks are coming off, keep rubbing the affected areas until all the scuff marks come off.
- Remove stubborn scuff marks with a water displacement spray such as WD-40. Spray the stained area before wiping it with a cloth. If the stain color is visible on the fabric, then it is coming off. Repeat if necessary.
These June Gold Kneaded Rubber Erasers (link to Amazon) are great for cleaning scuffs on baseboards. They’re absorbent, affordable, and is easy to use.
7. Sand Chipped Area Before Applying Primer and Paint
If the damage on your trim is superficial, such as chipped paint, you can quickly fix this by:
- Scrape the chipping paint with a paint scraper. Carefully scrape the site so that you don’t gouge the wood.
- Use a wire brush to remove the debris. If you notice any more loose paint, scrape it off and then brush the area.
- Spread a thin layer of wood filler. Spread the filler slightly beyond the damaged area to ensure the whole section is covered.
- Follow the manufacturer’s instructions wait for the wood filler to dry. Then, if you can, give it a few hours to allow it to dry completely.
- Use fine grit paper to sand the filler until it is smooth and even to the surrounding paint. Don’t sand it until you get to the wood. Apply primer, and allow it to dry before you paint the baseboard.
Source: Build Direct
8. Sand and Clean Scratches on PVC Baseboards
Although PVC is sturdy, it occasionally picks up scratches. These scratches start collecting dirt, which will eventually ruin the appearance of the trim.
However, since the scratches are on the plastic, you can easily sand and smoothen them out.
- Use 220 grit or finer paper to sand the scratches. Then, use a clean, soft cloth and warm soapy water to clean the sanded area.
- Once the PVC trim dries, check if there are still some scratches left. For deeper scratches, use Epoxy and then sand the area until it is smooth.
9. Lightly Sand and Clean Water Damaged MDF Trims
MDF trims are susceptible to water damage. Some will swell, while others will start chipping.
If the MDF is chipping from water damage, you can easily fix this. However, if the baseboard is rotting because of plumbing issues, you need to fix the problem and replace the whole baseboard.
MDF sometimes develops blister-like swellings when it is damaged with water. If the damage is not significant, you can sand the damage, apply a thin layer of wood putty on the sanded area, and when it dries, sand it until it is smooth.
If the MDF baseboard is chipping, lightly sand the damaged area to remove the finish. Wipe the debris with a damp rag, and leave it to dry. Apply a sealant and then stain the area with the same color as the rest of the baseboard.
Conclusion
Baseboards are designed to protect the lower part of the wall from damage. Unfortunately, that means they suffer water damage, stains, chips, or scuffs.
Although this section can easily be overlooked, it will ruin your home’s appearance once it is damaged. Fortunately, you can fix most of the damage with the above options. However, if the damage is extensive, you may have no choice but to replace some sections or the entire baseboard.
Recommended Reading:
Declutter your home once and for all (Even if you have no time and don't know where to begin)! Learn More.
